The decision in brief
A guitar looper repeats recorded audio and can layer overdubs. First learn the exact record, play, overdub, stop and erase actions: the RC-1 defaults to record → overdub → playback, while the RC-5 manual shows record → playback → overdub. Build one short phrase, hear its boundary, then layer. Effects before the looper are recorded; effects after it process its output. Verify the model’s levels, power and saving procedure before relying on a phrase.
What matters most
- Learn the exact model and selected mode before recording or erasing.
- Separate recorded input, playback balance and the effect order.
- Check supported power, connections and saving; retain an important phrase using the supported backup or recording method.
What a looper pedal actually records
A looper captures the audio arriving at its input over an interval and repeats it. Overdubbing adds another performance while the existing phrase cycles. It does not infer a chord chart and create a new backing arrangement from it. A recorded timing mistake stays in the phrase unless you replace it or use an editing function that your device actually provides.
Start with one purpose: a chord pattern under a melody, a rhythm exercise or a songwriting sketch. A repeat that serves that purpose is more useful than a pile of layers. Recording time, number of memories and number of independently controlled tracks describe different capabilities; do not use them interchangeably.
Learn the state changes before recording music
The RC-1 manual is a useful warning against a universal “second tap means play” rule. Its default recording sequence differs from the RC-5 owner’s manual. Check the selected mode on your own device before using the following examples.
| RC-1 operation | Documented behaviour |
|---|---|
| Default sequence | Record → overdub → playback |
| Alternative recording mode | Record → playback → overdub; configurable using the manual’s procedure |
| Loop indication | Red: recording; red plus green: overdubbing; green: playback |
| Stop during playback/overdub | Two presses within one second; immediate in default stop mode |
| Hold at least two seconds during playback/overdub | Undo or redo |
| Hold at least two seconds while stopped | Erase the phrase; it may briefly play during the hold |
These rows describe the RC-1. Its alternative stop mode waits until the phrase ends and erases it. Do not enable that mode expecting only a delayed stop. Practise on a disposable phrase and distinguish stopped, playing and overdubbing before holding the pedal. Consult the exact manual for changing modes rather than borrowing another model’s power-on button sequence.
Sources: BOSS RC-1 owner’s manual: modes and pedal operations; BOSS RC-5 owner’s manual: WRITE and computer backup
Make the first phrase short and rhythmically clear
Here is a proposed exercise, not a session we performed. Use a simple two-bar pattern in 4/4 and count one complete lead-in bar. Start capture on beat one; close the recording on the next beat one after the two bars. The boundary is the beginning of the next cycle, not a pause after finishing the phrase.
With the RC-1’s default sequence, that closing press enters overdub. Stop playing and press once to reach playback before evaluating the phrase. In its alternative recording mode, closing capture reaches playback directly. Keep the selected mode in your notes.
Hear several cycles. If the boundary rushes, has a gap or clips an attack, make a new foundation. Play a second part live before recording it. Add one deliberate layer only after the accompaniment and live part are audible together. This separates foot timing, listening and arrangement decisions.
Sources: BOSS RC-1 owner’s manual: modes and pedal operations
Understand effects before and after the looper
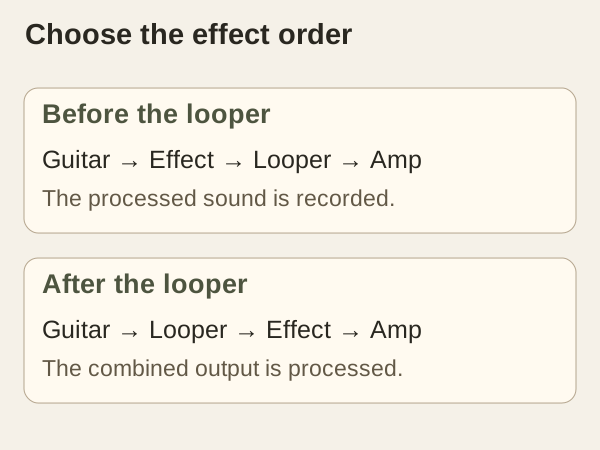
An effect before the looper shapes what is captured. A layer recorded with that effect retains that sound when you change the earlier effect for a later layer. An effect after the looper processes the output it receives, including loop playback and the live signal passing through that path.
For example, distortion after a looper responds to the combined signal; that is a different arrangement from capturing each distorted part before the looper. The diagram illustrates the routing logic, not a measured tone comparison. Choose the path for the musical result, then verify it with the actual rig.
An amp effects loop needs a compatibility check in both manuals. A nominal input figure does not establish maximum headroom or approve every line-level send. Never connect an amplifier speaker output to a looper input. For unfamiliar routing, use a qualified technician. Reduce volume and follow the device’s connection and power instructions before changing cables.
Keep input, playback and listening levels manageable
On the RC-1, LEVEL adjusts recorded playback, not the input level. Turning it down therefore cannot cure input overload. Begin with one clean phrase and compare live and recorded signals before adding layers. If distortion appears, note whether it is already at the input, only on playback or only after later gain.
The RC-1 specifications list a nominal input level of −20 dBu and 1 MΩ input impedance. They specify a 9 V alkaline battery or the designated PSA-series adaptor, with 95 mA current draw. These are RC-1 facts, not universal looper requirements. Confirm supply voltage, polarity, connector and current capacity against the exact unit’s documentation; “9 V” alone is insufficient.
Use a compatible amp or monitoring path. The RC-1 manual says not to plug headphones directly into its OUTPUT jack. Keep listening comfortable and simplify crowded parts before raising overall volume to find the live guitar.
Sources: BOSS RC-1 owner’s manual: modes and pedal operations; BOSS RC-1: recording capacity and electrical specifications
Choose features from the musical task
Choose the feature that solves your task. One repeating accompaniment needs a workable capture and stop action. A live arrangement may need a separate stop switch, clear state display or individually controlled tracks. A set of recalled songs needs documented storage and retrieval. Those are different requirements.
The RC-1 supports up to approximately 12 minutes of stereo recording and retains the last phrase through power-off. Retention is not a backup guarantee or a library of song memories. Follow its power-off warning: do not interrupt power while the LOOP indicator is rotating or blinking.
The RC-5 has a different saving workflow. Its manual requires WRITE to keep a recording or edit before selecting another memory or turning off power. Use SETUP plus MEMORY to open the utility, select WRITE, choose the destination and confirm with the MEMORY/LOOP LEVEL knob. Confirm the destination before saving. Its USB port supports computer backup/recovery; that statement establishes neither USB power nor USB audio-interface operation.
Sources: BOSS RC-1 owner’s manual: modes and pedal operations; BOSS RC-1: recording capacity and electrical specifications; BOSS RC-5 owner’s manual: WRITE and computer backup
Use a loop as an honest practice reference
Use a sparse accompaniment so you can hear the live part. For a timing exercise, choose one transition and listen across several boundaries. For melody practice, leave space and finish a phrase against the next cycle. An uneven loop gives you an uneven reference; replace it rather than practising around its error.
A recorded loop repeats its timing, including imperfections. Repetition alone does not make it a metronome or prove that its clock is synchronized to another device. A separate steady reference can help you hear where your capture changed the pulse; check whether any automatic timing mode is active before interpreting the result.
Check tuning first using the standard-tuning guide. For a contrasting live part, the pickup-position comparison describes another sound choice. A change of pickup cannot fix a badly timed boundary.
Diagnose gaps, level jumps and missing recordings
Change one thing at a time and keep a short record. This table is a diagnostic starting point, not a remote fault diagnosis.
| Symptom | First comparison | Record before concluding |
|---|---|---|
| Gap or clipped boundary | Re-record the same short count without extra layers | Start/close beat, selected mode and any automatic timing function |
| Level jump after overdub | Compare one layer and the added layer through the same path | Input settings, playback setting and gain after the looper |
| Noise grows with layers | Record one clean phrase and listen before layering | Source noise, routing and which operation adds the symptom |
| Phrase missing later | Check the exact save/retain procedure | Model, memory, completed save and power event |
Do not erase a valuable phrase as a troubleshooting step. Use a disposable memory or supported backup first where available. A saved phrase is still vulnerable to loss; keep important work using the model’s supported backup or recording method. An unexplained failure after the documented checks needs manufacturer support or technical diagnosis.
When this advice changes
A microphone, keyboard or passive acoustic pickup may require different input handling. Check the complete source, preamp, looper and listening path. Two connectors do not by themselves establish stereo routing; a USB socket does not establish recording-interface or power capability.
A free-running phrase cannot follow a drummer’s changing timing automatically. If the arrangement needs synchronization, verify the exact clock, MIDI or timing features and decide which device provides tempo. Do not infer those features from the word looper or copy a different model’s settings.
For live work, rehearse the required stop, mistake recovery and a way to continue without the loop. Use the actual selected modes and monitoring. This is a proposed rehearsal check; we did not test a pedal on stage.
The first-loop and buying checklist
- Name one musical task and confirm the full input/output and power path.
- Write down the selected capture sequence, stop action and erase action.
- Make one short phrase and hear several boundaries before overdubbing.
- Balance playback and live guitar; keep input overload separate.
- Compare the effect order the arrangement needs.
- Complete the exact saving or retention procedure before changing memory or power.
- Before buying or adding complexity, try the essential controls and confirm the missing capability.
A useful session note contains the model, mode, phrase length, routing, level settings, storage action and what remains uncertain. It makes a repeated problem easier to investigate and a successful arrangement easier to reproduce. Extra recording capacity does not substitute for a phrase you can start, hear and stop.
Frequently asked questions
What does a guitar looper pedal do?
It repeats captured input audio and can layer overdubs. Controls, editing, storage and synchronization depend on the exact model and selected mode.
Where should a looper go in the pedal chain?
Earlier effects are captured into recordings; later effects process the looper output. Choose the musical result and verify input/output compatibility, especially for an amp effects loop.
Why is there a gap between repeats?
Try the same short phrase while counting the opening and closing beats. Note the capture mode and any automatic timing functions; the symptom alone does not prove hardware failure.
Does every looper keep recordings after power is removed?
No universal retention rule applies. The RC-1 retains its last phrase; the RC-5 requires WRITE before changing memory or powering off to keep new recordings or edits. Neither is a backup guarantee.
Do I need multiple loop tracks for practice?
One repeating accompaniment can serve a first routine. Separate track control becomes relevant when the arrangement needs it; check length, sync and stop rules rather than track count alone.
How this guide was prepared
We read the public BOSS RC-1 English owner’s manual (RC-1_eng03_W), current RC-1 product specifications and RC-5 owner’s manual (RC-5_eng02_W), including their control diagrams, power/storage notices and USB description. We extracted and rendered the two PDFs and inspected the retained images. Model manuals take precedence over the beginner article’s broad pedal-order description. The two-bar routine, comparison table and rehearsal notes are editorial proposals; we operated, connected, measured and performance-tested no loopers. We claim no human technical reviewer. AI assistance was used for source comparison and language checks.
Documentation checked .
Added a model-specific RC-1 control example with its actual default and alternative order, distinguished playback level from input overload and nominal level from compatibility, compared RC-1 retention with RC-5 WRITE/USB limits, corrected image claims, and added traceable sources and methodology.