The decision in brief
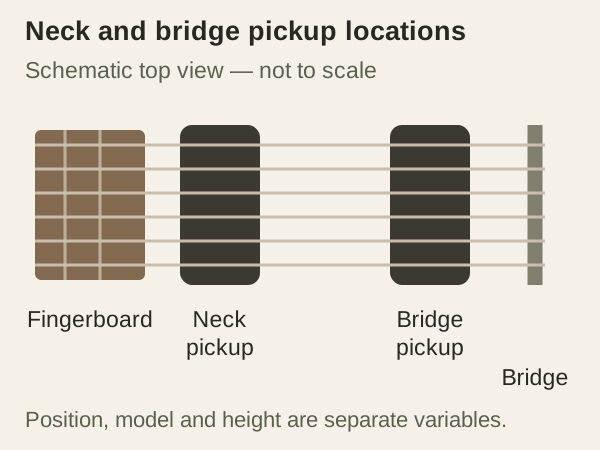
The neck pickup is nearer the fingerboard; the bridge pickup is nearer the bridge saddles. They sample different string locations, but the installed pickup models, height, controls and played notes also affect the result. Try both with amplifier input settings fixed to compare switching drive, then recordings at similar playback volume for preference. A neck/bridge model label describes intended use, not guaranteed tone or physical fit.
Locate the pickup before reading its model name
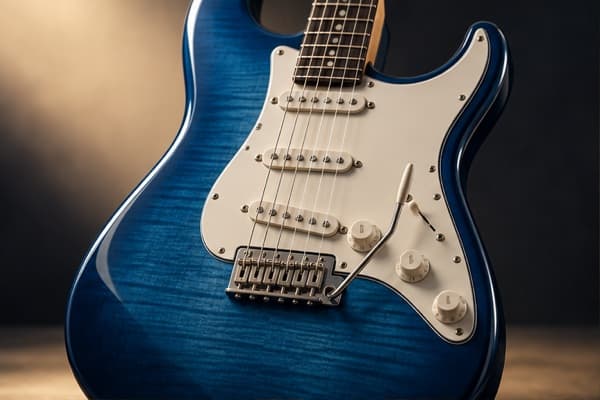
The neck pickup is the pickup nearer the fingerboard end of the body. The bridge pickup is nearer the bridge saddles. A guitar may also have a middle pickup, and its selector can combine pickups or activate particular coil modes. The words neck and bridge can describe physical placement or a maker's intended version of a pickup; those meanings should be recorded separately.
Moving a pickup changes which part of the vibrating string it samples. The relative harmonic response also depends on the played note; position is not one fixed brightness value. Seymour Duncan explains that string vibration is smaller near the bridge, which is one reason makers calibrate some bridge versions differently to balance positions. This principle helps explain the comparison but does not predict every frequency or volume difference in a completed guitar.
Identify the actual selector positions from the guitar's diagram or manual. On a modified instrument, do not assume that the switch follows a familiar pattern. A combined position may be series, parallel or involve a split, and it can sound different from either pickup alone. The humbucker guide explains those wiring distinctions.
Sources: Seymour Duncan: neck and bridge calibration; Seymour Duncan: humbucker magnetic/electrical connections
Compare the usual tendencies without making them rules
Players often describe the neck position as fuller or rounder and the bridge position as brighter or more defined. Those words are useful for finding a first comparison, but they are not a guaranteed response chart. A bridge humbucker with one winding can be fuller than another guitar's neck single coil. Controls, amplifier EQ and playing attack can also move the perceived balance.
| Question | Neck position | Bridge position |
|---|---|---|
| Where is it? | Nearer the fingerboard | Nearer the bridge saddles |
| Common impression | Fuller or rounder | More focused or bright |
| Useful first trial | Sustained line or clear chord voicing | Rhythm attack or a defined lead phrase |
| Potential complaint | Low notes lose separation | Attack feels too sharp or thin |
| What to check | Height, EQ, strings and exact design | Height, EQ, strings and exact design |
Test the same passage in both positions before attaching a genre to either. The goal is to hear which position serves the current musical job and whether the switch gives a usable contrast.
Position and design are two different comparisons
A calibrated pickup set can use a bridge model intended to compensate for the smaller string movement near that position. Makers may alter winding, magnets or other details. Two pickups that look alike may therefore be different electrical designs. Conversely, some guitars use similar designs in more than one position. Read the exact model data rather than assuming neck means low output and bridge means high output.
The single-coil versus humbucker comparison answers a pickup-family question. This page answers a position question. Comparing a neck single coil with a bridge humbucker on an HSS guitar is a valid comparison of its available sounds, but it changes family and position together. Do not claim the entire heard difference comes from location alone.
A pickup's DC resistance is also not a standalone loudness or tone score. Wire, coil arrangement, loading and the rest of the design matter. Use maker information to understand the intended application, then compare drive with amplifier input settings fixed and judge tonal preference from recordings at similar playback volume. If a separate replacement is being considered, check its mounting and electrical requirements before assigning it to a different position.
Sources: Seymour Duncan: neck and bridge calibration; Seymour Duncan: pickup design variables; Seymour Duncan: DC resistance and output limits
Use two passes for a fair listening test
Use this proposed routine on the same guitar, cable, amplifier and room. Tune first and record string condition, pickup models, selector wiring and known control settings. Use a low-string rhythm, a chord voicing and a sustained line; start clean, then use your normal gain as a separate condition.
First keep amplifier input settings fixed and record both positions without clipping the recorder. Note the actual switching level and drive. Then compare those recordings at similar playback volume for preference and clarity. Adjusting guitar volume or amplifier input gain changes drive, so label it as a different condition. If a recorder-input change is necessary, record it; a phone recording is a memory aid, not a calibrated output measurement.
| Record field | Neck / bridge notes |
|---|---|
| Identity | Physical position, pickup model, coil mode and controls |
| Fixed-input pass | Amp input settings, passage and switching balance |
| Similar-volume playback | Recording playback adjustment, note separation and preference |
| Limits | Height/strings/setup changes, noise conditions, questions not tested |
These are blank owner notes, not site results. Distinct neck and bridge models change design and position together. Different guitars add further variables; the comparison describes their usable sounds without isolating location.
Choose the position for the passage and arrangement
Try the neck position when a sustained melody needs a fuller edge, then check whether lower notes remain distinct. Try the bridge when rhythm articulation or a lead attack needs more definition, then check whether the upper strings become overly sharp. These are starting tasks for a trial, not genre prescriptions. Either position can work for clean or distorted playing with suitable controls and technique.
Listen in the arrangement if possible. A pleasing solo sound may obscure another instrument or lose definition once bass and drums enter. Conversely, a sound that seems lean alone may work clearly in a group. Avoid choosing a position exclusively from an isolated high-gain preset. Test the room volume and signal chain you actually intend to use.
A combined position is another option. Read the wiring before assuming what it should do, and listen to the same passages. Volume and tone controls can create useful variation without a hardware change. Make a small note of the selected position and settings for each passage, so practice develops a repeatable sound rather than a sequence of random switch changes.
Assess height and balance before buying new pickups
Pickup height is measured in relation to the strings using the maker's specified method, often with a string fretted at a stated position. The two sides of a pickup can be set differently. Record the present clearance and method before adjusting anything. Do not copy one universal millimetre target across different magnet strengths, pickup types and guitars.
Fender's setup guidance treats published numbers as starting references. Seymour Duncan's height guidance also describes different mounting arrangements, which means not every screw performs the same job. Use the exact instrument or pickup instructions, make small documented changes, and listen again. If access requires removing parts or the mechanism behaves unexpectedly, seek a technician.
Raising a pickup can change output and response, but too little clearance can introduce problems including string contact or undesirable magnetic interaction. Lowering it can help one complaint while changing the balance with other positions. Judge the guitar through every useful setting afterward. Adjustment should answer a defined symptom, such as an overpowering neck position, instead of chasing a number without a musical reason.
Sources: Seymour Duncan: model-dependent pickup height; Fender: conditional setup and pickup-height method
Diagnose muddy neck or harsh bridge complaints
If the neck sounds muddy, begin with known amp settings and compare clean. Check whether the complaint occurs on all strings or mainly lower notes. String condition, tone-control position, pickup height, strong bass EQ and gain can all affect separation. If only one note behaves abnormally, investigate local setup rather than treating the whole pickup family as the cause.
If the bridge sounds harsh, compare drive with amplifier input settings fixed, then recordings at similar playback volume for preference. Check the tone control, amplifier EQ, pick attack and listening position; record any input-setting change as a separate condition. A bright sound can become useful in an arrangement, but a persistently uncomfortable response may be a genuine preference issue. State it as a result on the current guitar and rig, not a rule that bridge pickups are unsuitable for clean music.
A position that suddenly loses output, crackles or cuts out may have a switch, connection or control fault. If a combined setting becomes unexpectedly thin after a modification, review the wiring and phase relationship with a qualified technician. These are diagnosis questions. A different pickup purchased before the problem is identified may reproduce the same fault or hide it temporarily.
What to verify if a replacement is still needed
Choose a goal the working guitar cannot currently meet, such as a different bridge attack while keeping an existing neck sound. Confirm the intended position, mounting format, dimensions, pole or rail layout, conductor type, control compatibility and switching plan. A pickup described as bridge is not automatically a drop-in fit for every bridge cavity.
Seymour Duncan discusses using a bridge model in a neck position as a possible choice, while warning that calibration can change balance and perceived fullness. That establishes possibility, not universal suitability. Consult the exact product documentation and a technician about the guitar's physical and electrical requirements. Preserve the existing parts and wiring record where reversibility matters.
After installation, repeat the listening routine and test each control. Evaluate the combined positions as well as the changed pickup alone. Record whether the original goal improved and which trade-offs appeared. A successful change can be specific: clearer low-string chords in this rig with manageable switching balance. It need not become an unsupported claim that one pickup is better in every instrument.
When this advice changes
A one-pickup guitar has no neck-to-bridge switch comparison. A piezo bridge pickup senses the instrument differently from a conventional magnetic pickup, so its bridge label does not imply the same behavior discussed here. Active electronics, unusual wiring, extended-range strings and specialized pickup designs also change the useful starting assumptions.
Additional fretboard length can constrain neck-pickup placement on some designs, but fret count alone does not establish its actual position or the audible result. Check the exact geometry. Keep complete construction, pickup model and setup in the comparison. For acoustic-electric systems, the question may be microphone or transducer blending rather than choosing between two magnetic positions.
Use this method where the guitar actually offers comparable magnetic pickup positions. For a different system, identify what the sensor measures and use its maker's guidance. A photograph or selector label is an introduction to the system, not a complete electrical diagram.
A practical position-selection checklist
- Identify physical positions and actual selector wiring.
- Separate position from the maker’s intended neck/bridge model and coil family.
- Keep amplifier input settings fixed for the same clean and driven passages.
- Compare recordings at similar playback volume for preference.
- Check the selected sound in its arrangement.
- Review documented height and controls before replacing parts.
- Record the guitar, rig, changed conditions and limits.
Use the position and controls that make the passage work. A working guitar with two useful, balanced sounds may need no change; diagnose a persistent limitation before choosing replacement hardware.
Frequently asked questions
Which pickup is the neck pickup?
It is the pickup nearer the fingerboard end of the body. Confirm the selector wiring to find the switch position that activates it.
Is the bridge pickup always brighter?
It often sounds more focused or bright, but exact design, height, controls and amplification can change that comparison.
Why can the neck pickup sound louder?
String motion, model and height can change level. Compare switching drive with amplifier input settings fixed, then recordings at similar playback volume for tonal preference; distinct pickup models do not isolate position.
Can a bridge pickup be installed in the neck?
Sometimes, but verify dimensions, wiring and intended calibration. Balance and response can change, so it is not automatically an equivalent replacement.
Should I change pickups if the neck sounds muddy?
Check strings, settings, controls, height and faults first. Replace a working pickup only after the musical goal and compatibility are clear.
How this guide was prepared
We checked Seymour Duncan’s neck/bridge calibration and alternative-position explanations, its height, design-variable and DC-resistance guidance, Fender’s conditional height method, and humbucker wiring documentation. Manufacturer examples support position/design distinctions, not a universal brightness or loudness order. The blank two-pass record is a proposed owner method. We played, moved, adjusted or measured no pickups and performed no human expert review. AI assistance was used for source comparison and language checks. Different pickup models do not isolate position.
Documentation checked .
Separates physical position, model calibration and played-note conditions, clarifies fixed amplifier input versus recording playback volume, and adds a blank position-comparison record.
Sources and further reading
- Seymour Duncan: neck and bridge calibration
- Seymour Duncan: a bridge model in the neck
- Seymour Duncan: model-dependent pickup height
- Fender: conditional setup and pickup-height method
- Seymour Duncan: pickup design variables
- Seymour Duncan: humbucker magnetic/electrical connections
- Seymour Duncan: DC resistance and output limits