
The short answer
A conventional 12-string electric guitar groups twelve strings into six courses. The low E, A, D and G courses combine octave partners; B and high E combine unison partners. You normally play the two strings of a course together. This adds paired pitches and attacks to familiar guitar parts, while string order, technique, tuning and the electric signal path shape what you hear.
The first useful question is what happens to a note you already know. Play the low-E course and, in the conventional arrangement, you hear an E with another E an octave higher. Play a B course and both strings are intended to sound at the same pitch. A chord gathers these paired sounds into one part.
That musical mechanism explains more than a description such as “shimmering.” It tells you which notes are present, what your picking hand reaches and why the rests between notes deserve attention too.
What matters most
- Six paired courses retain a familiar main-note layout while adding octave or unison partners.
- Pitch relationship and physical string order answer different questions.
- Use single-course listening, a short riff and familiar chords to learn the texture.
- Make rests, tuning and basic setup part of practice; use effects as a separate layer.
Six courses are different from twelve independent strings
A course is a group of strings normally played together. A conventional electric twelve-string uses two strings in each of six courses, corresponding to the usual six-string note layout. An extended-range guitar with independently played extra bass strings is a different idea.
For an ordinary chord, the fretting finger needs to stop both partners in the relevant course. The familiar six-string fingering can provide a starting point, but the contact involves paired strings. Your picking motion also needs to reach the pair rather than unintentionally sounding only one member.
You can deliberately isolate one string for tuning or an exercise. The fact that the strings form a course does not make them physically inseparable. It describes their usual musical use.
The conventional tuning map
The individual-note chart for D’Addario’s EXL150 electric twelve-string set provides a documented example of the conventional arrangement.
| Course | Notes sounding together | Relationship |
|---|---|---|
| Low E | E2 + E3 | Octave |
| A | A2 + A3 | Octave |
| D | D3 + D4 | Octave |
| G | G3 + G4 | Octave |
| B | B3 + B3 | Unison |
| High E | E4 + E4 | Unison |
The letter identifies the note and the number identifies its octave register. E3 is one octave above E2. A plus sign here groups the two partners; it does not show which one sits first across the neck.
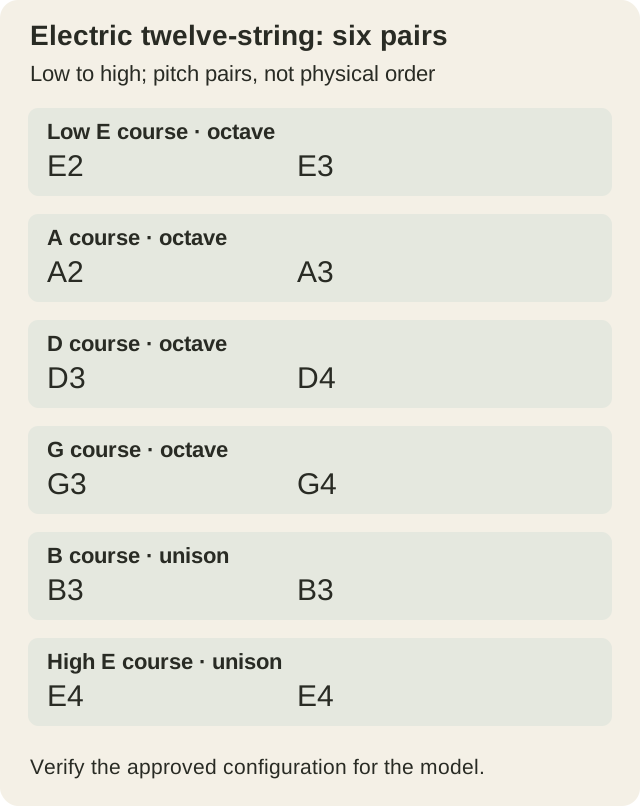
The pattern explains why the sound changes across the courses. A low-course note introduces a second register alongside the main note. The highest two courses repeat the same intended pitches on separate strings. All-unison and other specialist voicings differ from this map.
What octave and unison pairs add to a part
An octave pair gives one played note a lower and higher version at the same time. Follow a simple melody on an octave course and the partner follows the same contour in the higher register. You are not adding an independently chosen harmony such as a third or fifth.
A unison pair has two separate strings assigned to the same pitch. It still contains two physical attacks and decays, which can be heard as a paired texture. How obvious that texture is depends on the instrument, tuning, touch and recording conditions.
Begin with a single course. Sound each member separately, then sound the pair. Repeat the exercise on an octave course and a unison course. Listening to those small examples makes it easier to recognize what a full chord is doing.
Tune each partner to its intended pitch before comparing the course textures. An unsettled passage can raise a tuning or setup question. Listen with modulation effects bypassed first, so you can distinguish the string pairs from processing added later.
Physical order and the direction of your pick
Rickenbacker’s FAQ describes its twelve-string layout as having the normal string first and the octave string following. That documents one maker’s arrangement. It does not establish the physical order for every electric twelve-string.
On your own instrument, notice which member your usual downstroke reaches first. Compare a downstroke and an upstroke on one course, then use your regular fingerpicking motion. Listen for the beginning of the note as well as the sustained pair.
This is a technique exercise, not a ranking of string orders. A slight change in stroke angle may alter how distinctly you strike the partners. Use the motion that serves the phrase you are learning rather than treating one maker’s layout as the required twelve-string sound.
If the instrument has been modified, its present string order may differ from a factory diagram. Establish the actual arrangement before using a photograph or a generic chart as a restringing reference.
A simple riff for hearing the octave relationship
On an instrument confirmed to use the conventional map above, try a short riff on the low-E course: open, third fret, fifth fret, third fret. In note names, the main line is E, G, A, G. The partner moves through the same line an octave higher.
Play slowly enough to hear both strings. Keep the rhythm simple and leave a small rest after the last note. Repeat once with downstrokes, then with the picking pattern you would normally use.
For comparison, play the same main line on a six-string or isolate the fundamental partner on the twelve-string. Listen for the additional register when the full pair returns. This exercise demonstrates the documented pitch relationship; it does not compare the overall quality of two instruments.
Now try a different phrase you already know. A twelve-string does not require every part to use full chords. A short line can make the octave partner easy to hear and can leave space for the rest of an arrangement.
Explore familiar chords without filling every space
Start with a chord change you can play comfortably. Check that both partners in each intended course speak clearly, then play a steady accompaniment. The goal is to hear the chord as a musical unit rather than to make every string as loud as possible.
Next reduce the part: play fewer courses, shorten the chord or move to a higher register. Compare those versions against the same backing track. The paired strings supply a texture, but you still decide which notes the arrangement needs.
A fuller strum may suit one section while a smaller repeated figure suits another. Treat that as an arranging choice. There is no universal rule that twelve-strings must play gently, avoid distortion or occupy one particular genre.
If a vocal or another instrument is difficult to hear, consider the register, rhythm and sustain of the guitar part before adding processing. An attractive sound in isolation may need a different role when several parts are present.
Muting and phrasing are part of the texture
After hearing how a course rings, practise how it stops. Sound a chord, release it deliberately, and notice whether an unintended partner continues. Use the fretting and picking-hand approaches you already practise, adapting them to the paired layout.
Include rests in a riff or accompaniment exercise. A pause makes residual notes easier to hear and gives you a concrete musical reason to work on muting. It is more informative than playing an uninterrupted wall of chords.
For a phrase that uses bends or other expressive six-string techniques, try the movement slowly on the paired course. Its feel and result deserve their own practice. You can change the fingering or arrangement, or retain that phrase on a six-string, while using the twelve-string elsewhere in the song.
Tuning and setup support the playing
Before turning a tuning machine, identify the actual string, intended note and octave, and the configuration supported by the instrument maker. Tune individual strings and recheck the pairs and chords you use. A display showing the correct letter alone may still indicate the wrong octave. The guitar tuner guide explains how to get a stable reading.
If open strings agree but a fretted passage sounds unsettled, compare the two partners with normal fretting pressure. Guitar intonation explained covers that distinction. A listening observation can identify a question without establishing its mechanical cause.
Bridge designs differ. The manufacturer’s 360/360-12 parts diagram distinguishes a six-saddle assembly from a twelve-saddle assembly marked as available separately. Twelve strings therefore do not establish that twelve individual saddles are fitted. Identify the bridge actually on your instrument before discussing its setup. Have setup questions assessed on the actual guitar.
The Rickenbacker owner’s manual also notes that string type or gauge changes can require adjustment. Use the instrument’s supported stringing rather than improvising two unrelated six-string sets. These details help preserve the intended playing configuration.
The electric signal path is a separate layer
Paired strings produce the pitch relationships before an effect is added. The pickups, controls and amplifier then form the electric signal path. Begin with a clean setting so you can hear the note pairs, and introduce your usual effects afterward.
Use the model’s intended connection. On equipped Rickenbackers, the manual distinguishes the Standard mono output from Rick-O-Sound pickup-split routing and specifies one output jack at a time. Twelve strings alone do not require a stereo rig.
A short recording of one part, with the signal path noted, can help you compare your own technique and settings. It should be described as that recording, not as a universal sound sample for the entire twelve-string category.
Sources: Rickenbacker Owner’s Manual Rev K: Rick-O-Sound, PDF page 5
Start with one pair and one useful phrase
A twelve-string becomes easier to understand when you can hear what one course adds. Learn the pitch map, explore the attack, then use a phrase that has room for the paired sound. More strings give you another texture to work with; the musical part still comes from the player.
For the acoustic version’s construction and use, continue with 12-string acoustic guitar. If a capo is part of your repertoire, guitar capos explained covers fit, pressure and tuning.
Frequently asked questions
Do I need twelve new chord shapes?
Not for the conventional tuning described here. Familiar main-note relationships provide a starting point, while your fingers and pick work across paired strings. Modified tunings may require a different approach.
Does every pair contain an octave?
No. The conventional low E, A, D and G courses use octaves. B and high E use unison pairs.
Is the sound just an electronic chorus effect?
The paired strings exist independently of the effects chain. An effect can be added to their sound, but it does not explain the instrument’s built-in octave and unison relationships.
Is an electric twelve-string only useful for open chords?
No. Riffs, picked figures and other parts can use the paired texture. Choose the notes and articulation for the arrangement you are playing.
How this guide was prepared
This AI-assisted documentation review checked all twelve notes in D’Addario’s EXL150 chart against the retained six-course table and graphic, Rickenbacker’s maker-specific partner order, its 360/360-12 parts drawing and the Rev K manual’s tuning, string-change and output instructions. The riff uses note-name arithmetic for the conventional chromatic fret layout. The twelve-saddle drawing option is described as separately available; it does not identify the hardware on a particular guitar. Exercises are proposed learning methods. No instrument was played, tuned, adjusted, connected or recorded, and no human expert review was performed.
Documentation checked .
Clarified string and octave identification before tuning, the separately available twelve-saddle bridge option, and the source of the model-specific output instructions.