
The short answer
The guitar bridge is the body-side assembly that supports the strings through its saddle or saddles and helps connect their forces and vibration to the instrument. String anchoring may be integrated with it or located elsewhere. Saddle height and position can be involved in action and intonation, while a moving bridge system can provide arm-controlled pitch changes. Identify the exact design before discussing adjustments: a wooden acoustic bridge, electric hardtail and tremolo do not use one universal procedure.
Looking at a guitar’s bridge often reveals several parts at once: a support edge, screws, pins, posts or a separate tailpiece. It is easy to use one name for the entire cluster and then misunderstand which part changes the playing condition.
A useful first step is to follow a string without moving any hardware. Find where it is supported, where it is secured and which pieces connect those points to the body. This article explains those functions so you can describe an observation accurately and use the right model-specific instructions when service is needed.
What matters most
- Identify string support and anchoring as separate functions, even when one assembly combines them.
- The open string is supported by nut and saddle; fretting changes the neck-side support.
- Height, compensation position and pitch movement concern different bridge functions.
- Connect a playing observation to the exact design before choosing a service procedure.
Bridge, saddle and anchor name different functions
The bridge is an assembly or structure. On the conventional fretted guitars discussed here, the saddle provides a body-side contact point supporting the string. The anchor retains the string end, and may be within the same assembly, behind it or elsewhere on the instrument. A separate tailpiece can therefore belong to the string route without being the saddle.
Yamaha’s acoustic-guitar anatomy guide labels the bridge, saddle and bridge pins separately. On the illustrated acoustic design, those names help distinguish the wooden bridge area from the saddle on which the strings rest and the pins associated with the string ends.
| Component or function | What to identify | Question it helps answer |
|---|---|---|
| Bridge assembly | Body-side structure carrying the string support | Which complete design is fitted? |
| Saddle contact | Where the string leaves its supported vibrating section | Where is the body-side endpoint? |
| String anchor | Where the end is retained | What route and fitting secure the string? |
| Adjustment hardware | The parts named in the exact maker’s instructions | Which function can this part change? |
Some designs combine tasks in one piece. Others separate them. That is why identifying the functions is more dependable than expecting every bridge to have the same number of screws or a familiar-looking tailpiece.
The saddle supports the sounding string
Yamaha’s explanation of strings and pitch identifies the nut and saddle as the supports for an open string. When the player frets a note, the fret takes over the nut-side support for that sounding segment. The saddle remains the body-side support.
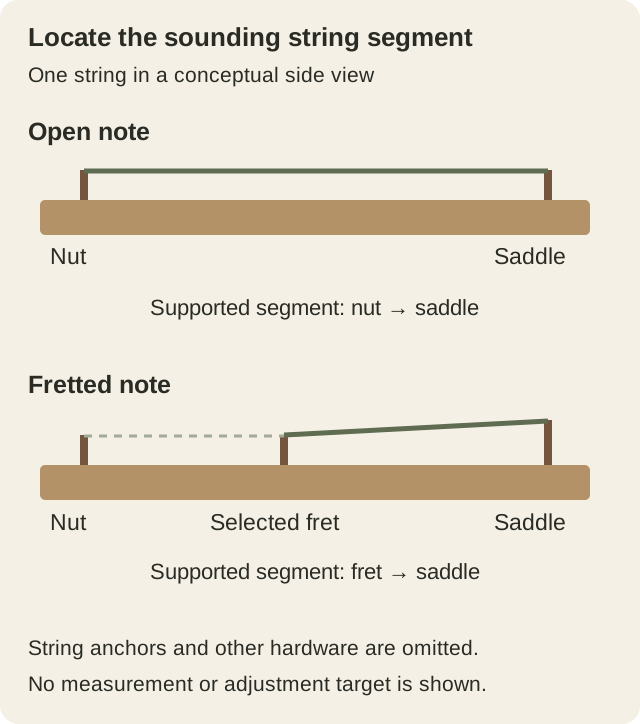
This makes the saddle’s location useful for understanding both an open note and a fretted note. A string can continue beyond the support toward its anchor, but that extra route is not the same thing as the ordinary nut-to-saddle speaking length.
The measured instrument and its compensation still require the correct reference points. The scale length guide explains that measurement question. The schematic above simply helps you locate the functional endpoints; it does not give the exact compensated length of any model.
An acoustic bridge works with the soundboard
Yamaha’s acoustic guide explains that string vibration passes through the bridge into the instrument’s body. On that acoustic design, the soundboard is part of the sound-producing system. The bridge should therefore be understood within the complete body construction rather than as an isolated decorative piece.
Identify the saddle on the actual guitar and follow the string beyond it toward the securing arrangement. Some acoustic string systems use pins, while others use a different end-fitting or tie arrangement. Use the maker’s documentation for the particular design instead of transferring a restringing method from a visually similar instrument.
Notice the distinction between observing and changing. You can identify a contact point or photograph an uncertain fitting without removing a saddle, pulling a pin or altering the string route. If the bridge appears to lift or the string seating seems wrong, obtain a qualified assessment before continuing a playing experiment.
A replacement material alone does not establish an improvement in volume, sustain or balance. Those claims require evidence about the actual instrument and comparison conditions. A normal technical conversation begins by identifying the fitted parts and the musical or service question you want to answer.
Electric bridge designs divide the tasks differently
A fixed electric design may provide individual saddles, a shared support or a combined bridge-and-anchor arrangement. On another design, a separate tailpiece retains the ends while the strings pass over the bridge. Follow the route on the actual instrument rather than assuming every visible metal part has the same role.
The Taylor SolidBody bridge document gives a useful specific example: its stoptail assembly holds individual saddles, which can move for intonation, while the assembly’s height is adjustable. The document also identifies its bezel and bottom plate. Those parts belong to that Taylor system, not to every electric bridge.
The example shows why an instruction such as “raise the bridge” needs a named design. One instrument may provide a way to move the whole support; another may use individual saddle adjustments. A screw’s position or appearance does not establish what it does.
For general family terminology, use the fixed bridge versus tremolo comparison. Here the goal is to locate support, anchor and adjustment functions before deciding whether any of them needs attention.
Saddle height is one part of the action question
Action describes the string’s height above the frets at a stated measuring position. The bridge-side support can affect that height, but action is a condition of the complete string and neck relationship. Neck relief, nut-side conditions and the rest of the setup also deserve their own checks.
PRS’s setup guidance distinguishes adjustment provisions for several bridge types. That is a useful reason to identify the fitted hardware before choosing a tool or movement. It is not a set of dimensions for every guitar, including an acoustic with a different saddle construction.
If a note needs excessive pressure or does not speak cleanly, record the string, fret, tuning and normal playing approach. Play an ordinary phrase as well as the isolated note. A precise observation gives a teacher or technician more information than saying the bridge is “too high” without a measurement or context.
The action guide explains how to describe string height. This bridge overview supplies no universal target height and no generic instruction to file a saddle or turn a post.
Saddle position and intonation answer a different question
Intonation concerns whether the fretted notes agree with the intended tuning across the neck. The body-side support position can be adjusted on designs that provide suitable compensation hardware. PRS describes tuning the open string, then comparing the 12th-fret harmonic with the fretted 12th-fret note on its instruments.
Height and length are separate dimensions, even when their adjustments interact in a full setup. Raising the support is not the same movement as changing its position along the string. Nor does moving a saddle automatically resolve every fretted-pitch problem.
String condition, fretting pressure and the rest of the setup affect the observation. Use a stable tuner reading and normal pressure when comparing a note. Identify a repeatable discrepancy before assigning its cause. The intonation guide covers that listening and reading distinction.
Some designs give every string an independent saddle; others group strings or use a single shaped support. Describe the available mechanism without ranking it by the number of visible parts. Any proposed correction still needs the model’s procedure and assessment of the actual condition.
Sources: PRS: How to Set Up a PRS Guitar
A moving bridge adds another playing relationship
An arm-operated pitch system can include a separate vibrato tailpiece. Bigsby’s setup guidance discusses several bridge types used with its tailpieces, identifying them as separate components. Follow the complete string route to understand which mechanism the arm operates.
A moving-bridge system can also change pitch during a note or chord. Players commonly call it a tremolo, although the pitch movement is vibrato. Fixed and moving families differ in musical function as well as the way their supporting parts are maintained.
On spring-balanced floating designs, strings and the return mechanism form an interacting system. PRS’s guidance treats bridge angle and spring adjustment separately from the action and intonation checks. Its instructions also identify model differences, so a bridge should not be forced into a generic angle based on another guitar’s photograph.
If the arm is part of your phrasing, listen to the note before the movement, during it and after release. Use the normal supported motion for that system. An unexpected return-to-pitch result is an observation about the full instrument; it does not identify a worn pivot, nut friction or another cause by itself.
For a guitar without an arm, you can still study articulation and palm muting around the bridge area. The available hardware functions and the technique you use should be described separately.
Sources: Bigsby: Vibrato Setup Tips; PRS: How to Set Up a PRS Guitar
Palm muting makes the bridge area a playing reference
Try a comfortable repeated note, then add light palm contact near the body-side string support. Explore how changing the contact and pressure affects the note’s duration. Keep the hand clear of sharp or unfamiliar hardware, and stop if the position is uncomfortable.
Begin slowly and alternate an unmuted note with a short muted note. Listen for whether the attack remains clear and whether the note ends where the phrase requires. You are studying a controlled musical gesture, not trying to apply maximum pressure to the bridge.
Different hardware shapes can change where the hand settles. Compare the actual contact points with your normal picking position rather than concluding from a photograph that a bridge will feel comfortable. A teacher can help find a useful hand position when the unfamiliar layout interferes with the technique.
Once the movement is comfortable, place it inside the accompaniment you play. A shorter note can leave rhythmic space, while an open sustained version can serve another section. The bridge gives a location reference for the exercise; the player chooses the phrase.
Make an observation that another person can use
If you need help, identify the guitar model and bridge design, describe the string and fret involved, and state whether the problem follows fretting, a bend, arm use or a string change. Include the intended tuning and the current set where known.
| Observation | Useful information to retain | Question still open |
|---|---|---|
| A fretted note sounds out of tune | String, fret, open tuning and normal pressure | String condition, setup or compensation cause |
| The arm does not return as expected | Movement used and which strings change | Where in the full string path the cause lies |
| A muted phrase is awkward | Hand position, contact and musical task | Technique, hardware fit or both |
Use the exact manufacturer’s instructions for any service work. Taylor’s cited SolidBody document specifically directs adjustment to a qualified repair technician. Photographing an uncertain part and retaining the current condition can help that conversation without guessing at a screw’s function.
Follow the string before changing the hardware
Once you can distinguish the saddle support, string anchor and surrounding bridge assembly, the visible parts become easier to discuss. Connect the relevant function to action, intonation, pitch movement or hand contact, then describe what happens on the actual guitar.
Use the linked action, scale and intonation explanations for the next question. Understanding the bridge’s role gives those measurements a physical context and helps you seek a specific answer when a playing or service problem appears.
Frequently asked questions
Is the saddle the same thing as the bridge?
The saddle is the string-support part within or on the bridge assembly. Designs can combine components, but the names describe different functions.
Are bridge pins the string’s sounding endpoint?
On the conventional acoustic example, the saddle supplies the body-side support for the sounding string. The pins belong to the string-end arrangement. Follow the exact instrument’s fitting instructions.
Can I fix every action problem by lowering the bridge?
No. Action belongs to the complete setup, and bridge designs provide different adjustment methods. Identify the observed condition and use the maker’s procedure or a qualified assessment.
Does a heavier bridge guarantee more sustain?
This guide establishes no such guarantee. An audible comparison needs the actual instruments and conditions, with strings, setup and other construction variables considered.
How this guide was prepared
Documentation checked October 18, 2026. Yamaha’s anatomy and string-support explanations were checked against the conceptual drawing. The Taylor SolidBody bridge document supports only that assembly’s height and saddle functions and its qualified-technician instruction. PRS’s setup article supplies the named action, bridge-angle and intonation examples; Bigsby’s bridge list distinguishes a vibrato tailpiece from the bridge used with it. These manufacturer examples are not universal adjustment instructions. The code-native graphics are schematic and carry no model dimensions. Playing exercises are editorial observation suggestions; no bridge-material comparison, sustain test or physical adjustment was performed.
Documentation checked .
Specified the open-string tuning, twelfth-fret harmonic and fretted-note comparison in the cited PRS intonation example, and attached the original bridge, soundboard and service sources to the relevant sections.